Building A Comp Gun - Part 1 Selecting Components
Author / Zack Boughton, SG CONTENT DIRECTOR

Building a new gun is flat out addictive. Never before have we had more options when it comes to building and shooting guns, in this case a precision rifle. Today I felt some of that high that makes this endeavor so captivating. It came after I ordered a stock, barrel, and trigger for my new rifle, a part-time competition gun and a part-time coyote and antelope/deer rifle. To say I’m excited at this point would be an understatement. I’m jacked!

For me the point of this blog is to share my experience so that more people can understand what it looks like to build a gun from scratch. This includes selecting and ordering parts, assembling it yourself, becoming capable with it, and then competing as a first timer in some shooting matches. A big part of the build is that I’m building this gun entirely by myself, no gunsmith required. I’m not an expert and I don’t claim to be, just a guy who tries to do things the right way and learn along the way. So let’s dive in.
My timeline for this build was short. I had about 2 1/2 months to have a completed rifle. The reason being was that I had planned on shooting at least two precision rifle style events this summer. I’ve spent the last 9 years teaching myself the fundamentals of long range shooting and refining them with practice in the mountains. If my track record on game with a rifle is an indicator, then I'm a good shot as many of those encounters ended with one well placed and lethal shot. But there’s always room to improve and being great is the end goal. A shot in the mountains in the 400-800 yard mark comes with many, many variables that make a perfect shot much harder.

Competing in a few shooting matches made sense as a way to improve as the process of competing, building different positions, working under time, and calling wind all seemed like things that I could learn from and implement into my shooting in the mountains. We don’t get many opportunities in the field so being able to capitalize is key. That said, my rifle build needed to be done by mid March to allow me time to break it in, build dope, and be ready to compete. Most custom gun builds would require a gunsmith who might take a month or more to get your gun built. Some are faster and also do good work but this seems to be the rarity. So for this build I needed to eliminate that part from the equation. Insert pre-fit barrels. A pre fit barrel is one that is machined and chambered so that it can be screwed onto an action and headspace correctly. Basically it’s “pre fit” to your specific action. Now not all actions hold the tolerances necessary for this. Only actions that hold tight enough specs across their product line can have pre fit barrels produced for them. Some top names include: Defiance, Impact Precision, Lone Peak Fuzion, Bighorn/Zermatt Arms, and Tikka. Pre fit barrels come in two different types, shouldered barrels and barrel nut barrels. A shouldered barrel relies on the shoulder of the chamber side of the barrel to snug tight to the action creating the desired headspace. A barrel with a barrel nut requires the use of the locking nut to set the correct headspacing. Both are similarly easy to install and the use of go and no go gauges will confirm that your headspace is correct during installation. All that said, I decided to go the pre fit route and see what it was like to build a gun myself from the ground up. Having a few friends who had tackled the process helped make the decision more palatable also.
Next up I needed to decide what caliber I wanted to shoot. I needed to be able to find actual ammo and/or components qucikly, have the ability to hunt with it later down the road, and still have some moderate recoil to manage. Before we get too far down the road I'll admit, I was a 6.5 Creedmoor hater in the past. It was a highly popularized cartridge and felt more like a marketing strategy than a killer new caliber. I knew ballistically they were good but when everyone buys the same thing it feels more like following sheep. Add in hunters thinking they can transfer their 1000 yard steel shooting to 1000 yard elk wounding and I spoke more negatively about the caliber than I did positive. Yes, I was wrong in making some of those judgments but at least I’ve come to recognize that. So I grew up a little. After considering other chamberings I settled on building a 6.5 Creedmoor. Here’s why. As a hunting caliber I think there are much better options. But as a competition/crossover gun, especially one whose recoil might more similarly match a larger caliber and lighter hunting gun (and that’s what I want), it’s pretty dang solid. And the big kicker, finding components for this caliber is arguably the easiest of the popular 6mm and 6.5mm calibers that are most popular on circuits like the Precision Rifle Series (PRS). At the end of the day shooting this rig has to help my shooting in hunting situations. So when my gun recoils more than a 6BRA or similar small calibers I’ll be happy. I want to better master recoil management as well as solidify positional shooting. So 6.5 creedmoor it is.

Now for the build
To me the gun revolves around the action. To me it’s the foundation of the whole system so my build starts here. Actions provide many things but smooth ease of use and reliability are definitely high on the list of attributes. Precise build and ease of use with other components such as stocks, barrels and trigger is also something to look for. I won’t go too deep here on tech specs and the differences between actions, as there’s plenty of online banter in forums that covers that. So here’s how I made my decision.
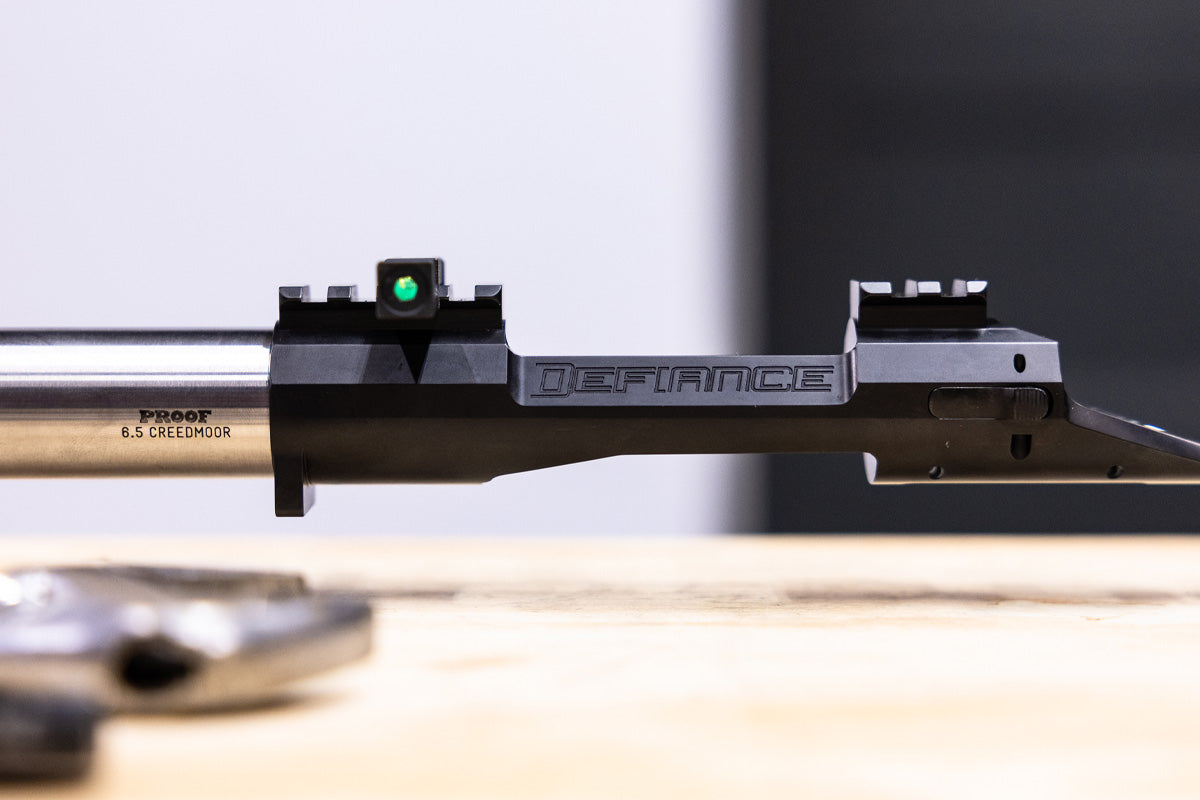
My long time hunting rig sports a Defiance short action from 2013 (see image below). After using it for years I’ve come to love the smooth and precise cycle on the bolt and it’s never failed me even on some demanding hunts in snow, ice, and rain.

Given I want both guns to feel similar it would make sense to look here first. Add in the fact that they’re built here in the state of Montana and I knew I probably wouldn’t need to look anywhere else. So scouring through their website it appeared that I’d want to look at the Ruckus, AnTi, and AnTiX actions. These all had pre-fit barrels offered for them and their build quality was exceptional. So searching specs it came down to saving about 8 ounces to run the AnTi over the Ruckus. I knew the bolt would run a touch better in the Ruckus since the normal bolt configuration has shallower grooves and more surface to glide. I wanted a little extra weight and smooth bolt throw and went with the Ruckus GA Hunter. I chose a Medium Action so that I can run bullets longer if I want and swapped out the standard bolt throw for their X-Long Knurled Tactical handle. As a final touch I selected their Nitride coating to give it a nice black finish.

Up next was the barrel. Now a good barrel is an extremely critical component as it plays a pivotal role in the accuracy of your gun. In my experience most quality barrel manufacturers build a barrel that will shoot as good as the shooter. For hunting most people pick a barrel with weight as the primary factor, as a hunting rig needs to not weigh 16 pounds if you’re out hiking deep into the mountains. For my build though some extra weight will help steady the rifle and also allow better accuracy over higher number strings of fire which are all assets when shooting for competition purposes. Most heavy contour barrels will fit the bill. Barrel contour just describes the size, shape, and weight of the actual barrel. When picking a barrel you’ll want to make sure the contour will fit your stock inlet, meaning it will fit the fore-end of the stock. As an added benefit with the pre fit route, you can always have extra barrels that can be screwed on. So if I want to hunt more with this rifle I could order a carbon barrel and shave about 4 pounds off of my gun. To start though I’m going with a heavy contour competition barrel as the gun’s primary role for this year is to shoot competitions. After some research I had narrowed my barrel choices to PROOF Research, Benchmark, Bartlien, and Red Hills as some high-quality choices. I decided to go with PROOF and here’s why. First they are another Montana based company and like I’d mentioned I like to support local, US companies when possible. The advantage with purchasing a PROOF was that they sell a pre-fit barrel that works with my action and it will need no gunsmith work. If you wanted to go with one of the other manufacturers you would need a good gunsmith to chamber and headspace your barrel before shipping it and that adds some cost and time to the purchase. So I found a pre-fit for sale from Front Range Precision out of Helena Montana listed for $509. Most other options looked to be closer to $800 so I was able to save a few dollars here and the quality of PROOF barrels is equally good. In the end I found a barrel made in-state, for less money than some of the other quality options. A 26” 8 twist competition contour barrel chambered in 6.5 Creedmoor was the choice.

A good trigger is key to get that action and barrel performing to their potential. A clean brake of the trigger is a must on any gun where precision is the requirement. When I thought of a trigger I immediately decided to mirror the trigger in my hunting rig. Two of my rifles sport a Jewell trigger and it was love at first sight. In my opinion they are the gold standard. Mine are set around 16-18oz and some might say that is too light for a hunting rifle. I disagree. First I never chamber a round in my rifle until I have a target animal in front of me and I’m in a position to shoot. Then having a light trigger forces me to respect the trigger area and make a very thoughtful approach to the trigger with my finger. For both of those reasons it makes sense to shoot the trigger and weight that you personally prefer. At this weight it’s enough to feel the pull and light enough to not force a squeeze if it doesn’t go off when you want.
Next I had to decide on a stock. Popular options include: Manners, MDT, Masterpiece Arms, Foundation, XLR, KRG, and McMillan. Considering this build would need to perform in competition situations it was key for me to first imitate the feel of my hunting rig, but to also have enough features to comfortably compete in most positions. A chassis is what most guys will run and so I started exploring options. After some research it looked like MDT, Masterpiece Arms, and KRG would be top contenders. The big cons of the first two (MDT & Masterpiece) was that both had long lead times to get most of their quality chassis. On the other hand KRG had everything in stock and the prices were definitely easier on the bank account. The Bravo for a Rem700SA in flat dark earth only runs $349.99. Impressive. Immediately I noticed the Bravo model as it’s grip was very, very similar to my Manners EH1 that I have on my hunt rig.

From there I knew I wanted both an adjustable cheek piece and adjustable length of pull. Check on both. After reading all the specs it appeared that my action, trigger, and barrel (contour is the key here) would fit the chassis. The next thing I wanted was full ARCA swiss in front of the magazine. This would adapt to my tripod and also bipod. Going through the accessories I saw an enclosed fore-end that had ARCA built in. It looked great and also added some extra space in the front of the gun. This would be key as there would be enough room between the magazine and the bipod to easily rest the gun on a bag.

When it comes to the end of your barrel there are really just two options: a muzzle-brake or a suppressor. I’ve been running a Thunderbeast Ultra-7 suppressor on my hunting rig for a few years now and really love it. So to keep things consistent I decided to run a can on this gun as well. I’m waiting for a second Ultra-7 that should show up soon but Thunderbeast makes a great mount called their CB Mount that is basically a short muzzle-brake that the can threads onto. This allow me to move my suppressor from gun to gun with ease and the precision means there’s no point of impact shift. Obviously on my hunting gun I’d always confirm zero before heading to the hills but the versatility this system offers is great. And when I pull the can off my threads are protected and the two port muzzle-brake cuts down a lot of recoil. Now from the standpoint of recoil management a dedicated muzzle-brake will provide the best performance. For me the added noise associated is a deal breaker. Go stand next to a gun that has a can versus a muzzle-brake and you’ll very much appreciate the shooters who run their rifles suppressed.

The number of options today in the precision riflescope market is pretty astounding. There are probably 10-15 brands that all build scopes fully capable of doing the job. For my build I wanted to run a scope that would be something I would hunt with but also provide all the features I need for competition shoots. Having run high end Vortex, Leupold, Bushnell, and Kahles I wanted to try another top contender that has some serious street credit. Insert Nightforce Optics. Nightforce has a reputation for being a well engineered scope that can handle use and abuse and reliably functions and tracks. It’s been on my list of scopes to try for years and for this build I wanted to go this route. After looking over the options I settled on an NX8 4-32x50 F1 with the Mil-XT reticle (see below image).

This is obviously not the same scope as my hunting rig but if you’re going to test different scopes a gun like this will allow me to compare and contrast and see what I really like from a feature set. The big difference here is price. The NX8 runs about $2,150 and the Kahles is roughly $3,500. So there’s a big gap there in price. Main differences between the scopes would be that the magnification throw is opposite on each scope. This will pose a few challenges but honestly manipulating this too much just doesn’t happen all that often. If you go the wrong way you immediately notice and just throw the other direction. Not much time lost in a hunting scenario and not a deal breaker. The other difference is that the reticles are not exactly the same but are very similar in that both provide a tree style reticle with numerous points for windage and elevation. Both utilize 2 tenth Mil increments so holding wind between the two will be be very much the same. The other difference is that parallax is located in different locations on each scope. Overall I felt like this would allow me to compare features and really dial in what I like out of a riflescope. So far after a few days of use I feel comfortable getting behind both and sending rounds down range. Time will tell which route I prefer.

This is part 1 of a 3 part series. Part 2 will cover the actual building of the rifle and have a video component and Part 3 will be a follow up after I've shot a few matches. So stay tuned kids.
